Battery switch on travel trailer function is crucial for managing your RV’s power. This guide dives into the hows and whys of these switches, covering different types, wiring, safe operation, and troubleshooting. We’ll explore how the battery switch interacts with your trailer’s electrical system, including shore power, generator, and solar, and how to maximize battery life on the road.
Understanding your battery switch is key to preventing electrical issues and keeping your travel trailer running smoothly. From basic operation to advanced troubleshooting, we’ll equip you with the knowledge to confidently manage your RV’s power system. We’ll cover everything from safe connection and disconnection procedures to diagnosing and fixing common problems, ensuring a safe and enjoyable RV experience.
Understanding Battery Switch Functionality in Travel Trailers
Your travel trailer’s battery switch is a crucial component for managing your power system. It allows you to control the flow of power from your batteries to your trailer’s appliances and systems, and importantly, to disconnect your batteries completely to prevent drain and potential damage. Understanding how it works is essential for maintaining your trailer and preventing unexpected problems.
Battery Switch Purposes
The primary purpose of a battery switch in a travel trailer is to isolate the house batteries from the rest of the electrical system. This is vital for several reasons. Firstly, it prevents accidental drain of your batteries when the trailer isn’t in use. Secondly, it provides a safety mechanism to disconnect the batteries during maintenance or repairs, preventing accidental shocks or short circuits.
Finally, it allows you to selectively use either one battery or both simultaneously, maximizing power usage or extending battery life.
Types of Battery Switches
Several types of battery switches are commonly used in travel trailers. The most common is the 1-2-Both switch. This type allows you to select either battery 1, battery 2, or both batteries to power your trailer. A simpler type is the disconnect switch; this simply turns the power to the batteries completely on or off, providing a basic on/off function.
Some more advanced systems might incorporate a battery combiner, allowing automatic charging and switching between batteries based on their charge levels.
Typical Wiring Configuration
The wiring configuration for a battery switch varies depending on the specific switch and the trailer’s electrical system. However, a typical setup involves the positive (+) cables from each battery connecting to the switch’s input terminals. The output terminal from the switch then connects to the positive bus bar or distribution panel supplying power to the trailer’s appliances. The negative (-) cables from the batteries are typically connected directly to the chassis or a common ground point.
This setup ensures a safe and controlled flow of power to the trailer’s systems.
Basic Battery Switch Setup Diagram
| Component | Description |
|---|---|
| Battery 1 (+) | Positive terminal of the first house battery. |
| Battery 2 (+) | Positive terminal of the second house battery. |
| Battery Switch | A three-position switch (1-2-Both) controlling power flow. |
| Distribution Panel (+) | Positive bus bar or distribution panel supplying power to the trailer. |
| Battery 1 (-) | Negative terminal of the first house battery, connected to chassis ground. |
| Battery 2 (-) | Negative terminal of the second house battery, connected to chassis ground. |
| Chassis Ground | The metal frame of the travel trailer providing a common ground point. |
Connecting and Disconnecting Batteries
Connecting and disconnecting your RV batteries using a battery switch is a crucial part of maintaining your power system. Doing it correctly ensures the safety of you and your equipment, and helps prolong the life of your batteries. This section details the proper procedure and essential safety precautions.
A battery switch allows you to isolate your house batteries from the chassis battery and the charging system. This is important for preventing unwanted battery drain when your RV is stored, or for performing maintenance on individual batteries. Always remember to turn off any appliances before switching your batteries.
Safe Battery Connection and Disconnection Procedure
Follow these steps to safely connect and disconnect your RV batteries using a battery switch. Remember, always prioritize safety when working with batteries.
- Turn off all appliances and electronic devices powered by your RV’s house batteries.
- Locate your battery switch. It’s usually inside a compartment near your batteries.
- Identify the positions of your battery switch. Common positions include “Off,” “Both,” “Battery 1,” and “Battery 2.” Consult your RV’s manual if unsure.
- To disconnect, switch the battery switch to the “Off” position. This isolates all batteries from the RV’s electrical system.
- To connect, select the desired battery position (“Both,” “Battery 1,” or “Battery 2”) depending on your needs.
- After switching, verify the power is restored to the intended circuits. Check lights, appliances, and other devices to ensure the correct batteries are connected.
Safety Precautions When Working with RV Batteries
RV batteries contain corrosive chemicals and can produce explosive gases. Always take appropriate safety measures.
- Ventilation: Work in a well-ventilated area to dissipate any hydrogen gas produced by the batteries. Open windows and doors if working indoors or in an enclosed space.
- Eye Protection: Wear safety glasses or goggles to protect your eyes from splashes of battery acid.
- Gloves: Use rubber gloves to prevent skin contact with battery acid.
- Proper Tools: Use insulated tools to prevent accidental short circuits.
- Fire Safety: Keep a fire extinguisher nearby, especially when working near flammable materials.
- Neutralize Spills: Have baking soda on hand to neutralize any battery acid spills. Never use water on a battery acid spill.
RV Battery Maintenance Best Practices
Proper maintenance extends the life and performance of your RV batteries. These practices will help keep your batteries in top condition.
- Regular Cleaning: Periodically clean the battery terminals with a wire brush and baking soda solution to remove corrosion.
- Terminal Protection: Apply a corrosion inhibitor to the terminals after cleaning to prevent future corrosion.
- Water Level Check (for flooded batteries): If you have flooded lead-acid batteries, regularly check the water level and add distilled water as needed. Never overfill.
- Equalization Charging: For flooded lead-acid batteries, occasionally perform an equalization charge to ensure all cells are fully charged.
- Storage: When storing your RV for extended periods, disconnect the batteries to prevent parasitic drain. Consider using a battery tender to maintain a charge.
Battery Switch Inspection Checklist
Before and after using the battery switch, perform a quick inspection to ensure everything is functioning correctly and safely.
- Before: Verify all appliances are turned off. Check the switch position. Inspect battery terminals for corrosion.
- After: Confirm the switch is in the desired position. Check the functionality of appliances connected to the selected battery(ies). Look for any signs of overheating or sparking around the battery switch.
Troubleshooting Common Battery Switch Issues: Battery Switch On Travel Trailer Function
Dealing with a malfunctioning battery switch in your travel trailer can be frustrating, but with a systematic approach, you can often identify and fix the problem yourself. This section will guide you through common issues and their solutions. Remember safety first – always disconnect the negative battery terminal before working on any electrical components.
So, you’re an audiophile who travels? Awesome! Check out this guide on building the perfect audiophile travel setup for amazing sound on the go. It’s all about lightweight but high-quality gear. Then, once you’ve got your portable system dialed in, consider exploring advanced techniques for optimizing your sound in different environments. You might find some extra tips and tricks on another great resource: audiophile travel aetup , which delves into more specialized equipment and setups.
Battery switch problems usually stem from a few key areas: corrosion, loose connections, or a faulty switch itself. These issues can prevent your batteries from charging properly or even supplying power to your trailer’s systems. Understanding how to diagnose these problems will save you time and potentially costly repairs.
Corrosion on Battery Terminals and Switch
Corrosion is a common culprit. Acid from the battery reacts with the metal terminals and switch components, creating a buildup that restricts current flow. This buildup appears as a white, green, or blue powdery substance. You’ll often see this around the battery posts, the switch itself, and any connecting cables. To resolve this, use a wire brush or terminal cleaner to remove the corrosion.
Apply a corrosion inhibitor to prevent future buildup. For stubborn corrosion, a baking soda and water paste can help loosen it before brushing. After cleaning, ensure all connections are tight and secure.
Loose Connections
Loose connections, both at the battery terminals and the switch, are another frequent cause of battery switch problems. Vibration from travel can loosen these connections, interrupting the electrical circuit. Inspect all connections carefully, tightening any loose nuts or bolts. If the terminals are worn or damaged, they should be replaced. Make sure all wires are firmly seated and free of damage.
Battery Switch Failure
The battery switch itself can fail due to age, corrosion, or excessive wear. If you’ve checked connections and terminals and still have problems, the switch might be the issue. A multimeter can help diagnose this. Testing for continuity across the switch in its various positions will determine if the switch is properly making and breaking the electrical connection.
If the switch fails to conduct electricity when it should, it needs replacement. Replacing the switch involves disconnecting the battery, removing the old switch, and carefully installing the new one, ensuring all connections are secure.
Blown Fuses
A blown fuse will prevent power from reaching your batteries or your trailer’s systems. Locate the fuse box (often near the battery switch) and check for any blown fuses. Blown fuses are typically indicated by a broken filament inside the glass casing. Replace any blown fuses with fuses of the same rating. However, if a fuse blows repeatedly, there’s a more serious underlying problem that needs addressing, such as a short circuit, which should be investigated by a qualified technician.
Troubleshooting Flowchart
This flowchart helps systematically troubleshoot your battery switch issues:
| Step | Problem | Check | Solution |
|---|---|---|---|
| 1 | No power to trailer | Battery switch position | Ensure switch is in the correct position (e.g., “both,” “battery,” or “off”). |
| 2 | No power to trailer, switch in correct position | Battery voltage | Check battery voltage with a multimeter. Charge or replace batteries if necessary. |
| 3 | Low battery voltage | Battery terminals | Inspect for corrosion and clean/tighten terminals. |
| 4 | Still no power, clean terminals | Fuses | Check and replace any blown fuses. |
| 5 | Fuses blow repeatedly | Wiring | Inspect wiring for shorts or damage. Seek professional help. |
| 6 | All else checked, still no power | Battery switch | Test switch continuity with a multimeter. Replace if faulty. |
Battery Switch and Electrical System Integration

Your battery switch is the central nervous system of your travel trailer’s 12V DC power. It controls the flow of power from your batteries to the various components, and how they interact with shore power (hookups at campsites) and potentially a generator. Understanding this interaction is key to avoiding electrical issues and maximizing your off-grid capabilities.The battery switch works in conjunction with several key components.
The converter transforms shore power (120VAC) into 12VDC to charge your batteries and power 12V appliances when plugged in. The inverter does the opposite, converting 12VDC from your batteries to 120VAC for running higher-power appliances like microwaves or air conditioners when off-grid. Shore power typically bypasses the battery switch, feeding directly into the converter. However, the switch is critical for managing battery power to the inverter and other 12V systems.
Battery Switch Configurations: Advantages and Disadvantages
Different battery switch configurations offer varying levels of control and complexity. A simple single-battery switch allows you to connect or disconnect a single battery bank. A dual-battery switch lets you switch between two banks, offering redundancy and longer run times. More complex systems might incorporate a combination switch with a “both” position, allowing you to use both battery banks simultaneously for maximum power.
So, you’re an audiophile who travels? Awesome! Check out this guide on building the perfect audiophile travel setup for amazing sound on the go. It covers everything from portable DACs to noise-cancelling headphones. Then, for a different perspective and maybe some extra tips, jump over to this other resource on audiophile travel setups – they focus on lightweight yet high-quality gear.
Remember, good sound doesn’t have to stay at home!
Some even incorporate remote switches for added convenience.A single-battery switch is inexpensive and easy to install but lacks redundancy. A dual-battery switch provides redundancy and extended run time, but it’s more complex and costly. A combination switch with a “both” position offers maximum power but adds to the complexity and cost. The choice depends on your needs and budget; a simple system might suffice for occasional weekend trips, while extended camping necessitates a more robust setup.
Fusing the Battery Switch and Associated Circuits
Proper fusing is crucial for protecting your electrical system from overloads and short circuits. The battery switch itself should have a main fuse rated appropriately for the combined amperage draw of your battery bank. Individual circuits connected to the switch (like lighting, water pump, etc.) should also have their own fuses or circuit breakers. These should be sized according to the amperage rating of each appliance or circuit.
Always use fuses or circuit breakers with the correct rating – too low, and they’ll blow constantly; too high, and you risk fire. Consult your trailer’s wiring diagram and the specifications of your individual components for appropriate fuse sizing. Remember, this is a safety-critical aspect; incorrect fusing can lead to serious damage or fire.
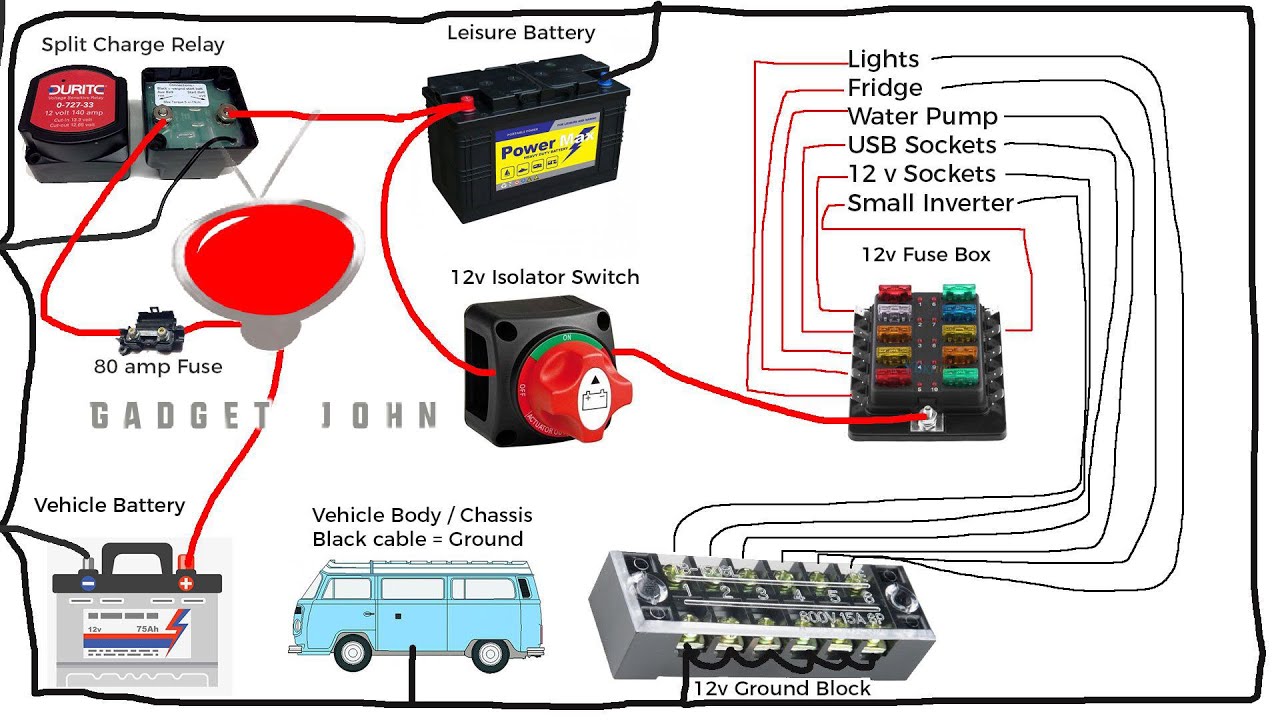
Typical Travel Trailer Electrical System Description and Illustration
Imagine a diagram. At the top, we have the shore power inlet. From there, a cable leads to the converter. The converter is depicted as a box with an AC input (shore power) and a DC output connected to the battery switch. The battery switch is represented as a three-position switch (off, battery 1, battery 2, or possibly off, battery 1, battery 2, both).
From the battery switch, multiple wires branch out, each leading to a fuse block. Each fuse protects a specific circuit (e.g., lights, water pump, refrigerator). Another wire leads from the battery switch to the inverter, which is shown as another box with a DC input and an AC output. The inverter supplies 120VAC power to higher-power appliances when the trailer is not connected to shore power.
Finally, at the bottom of the diagram, we have the two 12V batteries connected to the battery switch. The illustration clearly shows the flow of electricity from shore power to the converter, to the battery switch, and then to the various 12V and 120V components. Arrows indicate the direction of current flow. Each component is clearly labeled, and the fuse blocks are highlighted to emphasize their protective role.
The diagram visually represents the interconnectedness of the system and the crucial role of the battery switch in controlling power distribution.
Battery Switch and Different Power Sources
Your travel trailer’s battery switch is the central hub for managing power from various sources, ensuring efficient energy distribution and preventing unwanted backfeeding. Understanding its role in coordinating shore power, generator power, and solar power is crucial for maximizing your off-grid adventures. This section details how the switch orchestrates these different power sources and offers practical tips for conserving battery power.The battery switch acts as a gatekeeper, selectively connecting and disconnecting your batteries from different power sources.
When connected to shore power (hooked up to a campsite’s electrical supply), the switch allows the shore power to charge your batteries and power your trailer’s appliances. With the generator running, the switch similarly directs the generator’s output to charge the batteries and provide power to your trailer. Solar panels, when installed, feed their generated power through the switch to charge the batteries.
The key is that the switch prevents these sources from interfering with each other and avoids damaging your electrical system.
Power Source Prioritization and Battery Conservation
The way your battery switch handles multiple power sources directly impacts battery life and usage. For instance, many systems prioritize shore power. If shore power is available, the system will use that as the primary power source, reducing the drain on your batteries. When shore power is unavailable, the system automatically switches to the generator or solar panels (if available) and then finally to the battery.
This sequential prioritization helps to extend the life of your batteries. Using the switch to disconnect unused power sources, such as the solar panels at night or the generator when not in use, will also conserve power.
Optimizing Battery Usage During Travel
Efficient battery management is paramount for extended travel. Consider these strategies to extend the time between charges:
- Minimize appliance use: Running air conditioners, microwaves, and other high-drain appliances heavily depletes battery power. Use them sparingly, especially when not connected to shore power.
- Prioritize energy-efficient appliances: Opt for LED lighting and energy-efficient refrigerators to reduce power consumption.
- Utilize solar power effectively: Position your solar panels optimally to maximize sunlight exposure. Regularly clean the panels to maintain efficiency.
- Monitor battery levels regularly: Use a battery monitor to track your battery’s state of charge and adjust your power usage accordingly. This helps prevent complete discharge, which can damage your batteries.
- Plan your power usage: If you know you’ll be boondocking (off-grid camping) for a few days, plan your activities and power consumption accordingly to avoid running out of power.
Importance of Isolating Batteries When Not in Use, Battery switch on travel trailer function
Properly isolating your batteries when not in use is crucial for preventing parasitic drain and preserving their lifespan. Parasitic drain refers to the slow, continuous discharge of your batteries even when your trailer’s appliances are turned off. This is often caused by small electrical loads, such as clocks or low-level electronics.
- Complete Isolation: When storing your travel trailer for an extended period, completely disconnect the batteries from the trailer’s electrical system using the battery switch. This prevents any parasitic drain from depleting your batteries.
- Regular Checks: Even with the batteries isolated, it’s good practice to periodically check their voltage to ensure they aren’t losing charge. A slow drain might indicate a fault somewhere in the system.
- Battery Tender: For long-term storage, consider using a battery tender or trickle charger to maintain a proper charge level and prevent sulfation, a process that can damage your batteries.
Mastering your travel trailer’s battery switch is about more than just flipping a switch; it’s about understanding your RV’s electrical system and ensuring safe, efficient power management. By following the safety precautions and troubleshooting tips Artikeld here, you can extend the life of your batteries, prevent costly repairs, and enjoy worry-free adventures on the road. Remember to always prioritize safety when working with electricity!
Query Resolution
What happens if I leave my battery switch in the “off” position?
Leaving the switch off completely disconnects your house batteries from the rest of the trailer’s electrical system. This prevents battery drain but also means no power to appliances or lights.
How often should I check my battery switch connections?
Inspect your connections at least once a year, or more frequently if you notice any performance issues. Look for corrosion, loose wires, and damage.
Can I use a different type of battery switch than what came with my trailer?
While possible, it’s best to consult an RV technician before replacing your battery switch. Different switches have different amperage ratings and may not be compatible with your system.
My battery switch is making a clicking noise. What could be wrong?
A clicking sound often indicates a problem with the switch itself or a low battery voltage. Check your battery voltage and the switch for any visible damage.
